domingo, 23 de setembro de 2012

PREPARATIVOS PRA O PRÓXIMO CAMPING

             Enquanto não viajamos vamos nos preparando para o próximo acampamento, feriadão de outubro chegando e estamos  pensando em ir para Conceição de Ibitipoca, em Minas, visitar mais uma vez o Parque Estadual, mas  ainda não escolhemos o camping.
 
           Já que começamos acampar a pouco tempo sobra muita animação e  faltam muitos equipamentos, mas  aos poucos vamos fazendo nossas comprinhas ou fazendo por nós mesmos os equipamentos. 
 
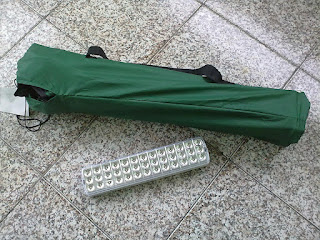
             Hoje encontrei no supermercado Extra uma mesinha pequena  articulável de camping  que custou R$ 23,00 ( achei um precinho bom, pois tinha visto uma similar por R$ 40.00 essa semana na net, quase comprei, mas pensei melhor e não fechei a compra, nada como pesquisar um pouquinho).
 
            A luminária led comprei por R$ 19,00 na casa e vídeo. Depois de ler no blog Camping e Família umas dicas de iluminação, percebi que essa seria uma boa alternativa à lampada  que uso pendurada na barraca. Essa luminária de led é bivolt e tem baterias.


sábado, 15 de setembro de 2012

Faça você mesmo : banquinho para camping

Pesquisando na net informações sobre camping me deparei com esse site gringo que tem um tutorial de como construir um banquinho para camping bem legal, fica a dica para os mais habilidosos.
 
Olha ele aí:


Materials

  • three 1 1/8” Birch hardwood dowels (enough for three 24” pieces)
  • one brass 2.75” bolt
  • one 1.5” eye-hole bolt
  • two brass acorn nuts
  • three brass washers
  • three brass finishing washers
  • three brass 1” wood screws (big enough not to slip through the finishing washer)
  • finish (I used Osmo PolyX-Oil)
  • leather or other heavy material for the seat
Tools
  • sander
  • center-finder (optional, but helps)
  • drill
  • screwdriver
  • small socket wrench to fit acorn nuts
  • rags
  • knife
Instructions
1. Start by cutting your dowels to 24” or as close to that as possible. I bought two 48” dowels, so each leg is about 23 7/8″ after the saw blade’s share. Drill a hole completely through each one 10.5” from the top of each leg. Find the center of each leg’s top, and drill a small pilot hole for your seat-mounting screws. You’ll need this pilot hole to prevent your legs from splitting. Sand each of the legs smooth, and sand a little around the edge of the tops and a good amount on each bottom to round them out more. It doesn’t have to be perfect; just make sure you don’t shorten any leg with too much rounding.

2. After the legs are cut, drilled and sanded, apply your choice of finish and set aside to dry. As they are drying, you can work on the seat material. Download the seat template to see the exact size to cut your own. I chose leather because I have plenty of it around, but you could sew up a heavy canvas seat or any number of materials. Make sure it’s heavy and sufficiently reinforced, since there will be a good amount of stress on each corner.
On one corner of the seat, I left a tab for the carry strap, but this is optional. Mine’s attached to a closure strap, which I recommend having regardless of a carry strap. It’ll keep your stool from popping open in storage or carrying. I edged my leather pieces and treated the smooth surfaces with carnauba wax.

3. Once the legs are dry, assemble the structure by threading two of the legs together with the bolt, using the eye-hole bolt in the middle. Use washers on both ends, and attach the acorn nut. I actually cut my bolt down a little bit with a hacksaw, so it fit close. You’ll need a little play in the assembly to move, but it shouldn’t be gaping. Once those two legs are secure, feed the eye-hole bolt (which I cut down a little, too) into the third leg, and attach with a washer and acorn nut. Tighten both acorns securely with a socket wrench.


4. After the base is complete, attach your seat to each leg using a large finishing washer and the wood screw. Don’t over-tighten and strip out your holes, for you’ll need all the strength on these mounting points. After everything is secure, you can take a seat. The main bolt might bend a little to the stress, but that’s fine; it keeps its bend permanently, and that shape will aid in the folding-up state. Now you’re ready for your next campfire, sitting in distinguished comfort.

5. You’re done!


sábado, 8 de setembro de 2012

Piso ecológico para camping (DIY)

 
       Visitando muitos blogs e sites de campismo conheci o piso ecológico, gostei muito e  meu primeiro impulso foi comprar, mas depois de pesquisar o preço (salgadinho) do produto mudei de idéia, e resolvi  fabricar o meu piso alternativo. 
 
 
          Usei tela mosquiteira e fita para cadeira de praia( não sei o nome) para servir de viés , super simples para quem sabe costurar um pouquinho, nem precisa de muita prática não.
 
          Na acampada em  Teresópolis já tinha comprado a tela mas ainda não tinha tido tempo de costurar e embolou com o uso, mas usamos assim mesmo, foi muito bom, uma boa proteção sobre a grama.


Depois de pronto com ilhoses para esticar vai ficar muito bom.


Custo: R$ 10.00  3 mts tela mosquiteira 90 centavos o metro da fita para cadeira de praia, gastei 9mts

domingo, 2 de setembro de 2012

Camping Quinta da Barra Teresópolis

Essa estrada é linda, ainda mais num dia de sol como hoje.


Gostei da estrutura do Camping Quinta da Barra- Teresópolis, a área de camping é bem grande, gramada e muito arborizada. A maioria da área está em pequeno declive, nada muito sério, mas faz diferença para barracas grandes.


A área dos banheiros é bem limpa, tem água quente, ponto de luz- 220v, churrasqueiras, piscina, sauna .


 Achei fofo o gatinho monitorado . rs*


Teresópolis - Quando entrar setembro....

Nesse final de semana acampamos em Terê, para estrear nossa nova barraca Zeus da Guepardo. A nossa primeira barraca era a pequena Capri para 3 pessoas, muito apertada pra nós que somos bem grandes rs*, então após consultar muitos blogs de campismo resolvemos pela gigante Zeus.

 
 Muito tranquila para montar e em meia hora já tínhamos conseguido montar com facilidade, mesmos nós que não temos muita prática da coisa.


A  barraca é muito espaçosa e a área de avanço muito boa para organizar  comidas e coisa e tal...

 
O dia estava muito frio e a temperatura na barraca ficou muito confortável, resta saber se no calor ela vai ficar abafada...